Replacing Rear Differential Fluid
April 15, 2005
Written by: E. Long
Discuss this article in this forum thread
Introduction
This "how to" article was performed on a 2000 Ford Excursion but will apply to all other Sterling 10.5" rear axles. The concepts will also apply to virtually any other differential fluid replacement as well.
Goal
Differential Fluid on a Ford Excursion should be changed at 150,000 miles. I opted for Amsoil synthetic fluid as a replacement.
Required Tools:
(1) Jack
(2) Jackstands
(1) Razor blade (from utlity knife)
(1) Block of wood (to block front wheels)
(1) Drain pan
(1) 3/8" ratchet
(1) 1/2" deep socket
(1) 1/2" socket (short -- if you have large exhaust)
(1) 1/2" wrench (if you have large exhaust)
(1) Flat-edge screwdriver
(1) Breaker bar
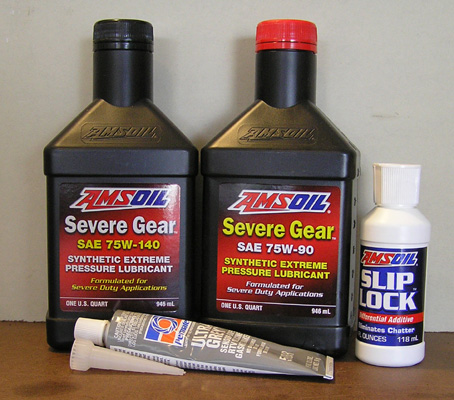
Products needed:
(4) Amsoil Severe Gear SAE 75W-140 (Sterling 10.5" rear)
(3) Amsoil Severe Gear SAE 75W-90 (Dana 50 front)
(1) Amsoil gear oil hand pump (fits Amsoil 1-quart bottles)
(1) Ultra Grey RTV Silicone Gasket Maker
(1) Amsoil Slip Lock (for rear limited slip)
Time Requirements
About 1 hour
Difficulty
1 out of 10 (1 being easiest, 10 being hardest)
|
Step 1: Jack up rear of vehicle
|


|
1.) Jack up rear of vehicle (leave plenty of room for you to work)
2.) Place block of wood in front or behind front wheel (to prevent the vehicle from moving)
3.) Position jackstands under the outer edges of the axle tubes
4.) Remove jack
|
|
|
Step 2: Drain rear differential
|
|
|
|
Step 3: Remove old gasket & clean differential cover
|
|
|
|
Step 4: Add gasket maker and reinstall differential cover
|
|
|
|
Step 5: Add differential fluid
|


|
1.) Remove the plug on the top of the differential with 3/8" ratchet (use breaker bar if necessary)
2.) The plug has a magnet on the end of it. This will have a lot of metal shavings (typical) on it. Remove the metal shavings with a rag.
3.) Add 4 ounces of Amsoil Slip Lock
4.) Using Amsoil pump, prime the pump
5.) Pump 3 quarts of 75W-140
6.) Reinstall plug
7.) Wipe off excess
|
|
|
Conclusion
|
|
This is a great DIY project for the weekend. Differential fluid has a unique smell (not pleasant, in other words), so be sure to dispose of it from your drain pan otherwise your garage will acquire this smell if it sits for a couple days.
|
|
Additional Questions or Comments?
|
|
Do you have additional questions or comments about this install article? Please discuss them in this forum thread.
HINT: Click the "printable page" button below to view this article in its entirety with higher-resolution photos.
|
Back to the installs page.